Wondershare Filmora9: The Best Camera Shake Effect Tool
Do all trimming, cutting or even rotating video clips is an effortless process in Filmora. But before edit please cut, trim part of video you don't need. The Wondershare Filmora also give useful effects, such as Green Screen or PIP and its users can choose from 8 different camera shake effects.To make camera shake effects to your videos, you must first download and install the latest Wondershare Filmora9 on your Mac or your PC (click the download button above).
1. Import video first
Open the editor in the Full Feature Mode. Click on Import menu, and select the Import Media Files option to add your video clips to the timeline and then drag video you want edit to timeline.
2. Edit video (optional)
Combine the clips to create a rough cut of your video. You can also add titles, transitions, overlays or music to make the project you are working on more complete.
3. Apply effects right now
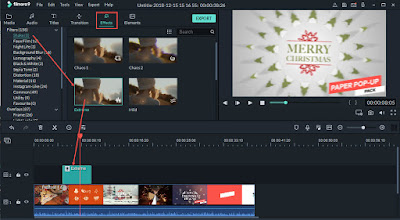
Applying the visual effects is one of the last steps of each video editing process, so after you've completed all other editing actions, click on the Effects icon and locate the Shake category.
Note: Please download the latest version of Filmora to apply shake effects.
You'll be able to choose from Chaos, Mild, Extreme, Up-Down or Sideways camera shake effects, and if you would like to preview the effect, double-click on it. After double click you can edit effect. Select the one you'd like to add to your video clip and drag and drop to the timeline
In order to adjust the duration of the effect, you should double and change duration..
4. Export video
Click on the Export button afte you recheck and after edit video. Choose the resolution of the video and the location on your hard drive where the video clip will be exported. You can also export your video and also upload to YouTube or Vimeo from Filmora.


No comments:
Post a Comment